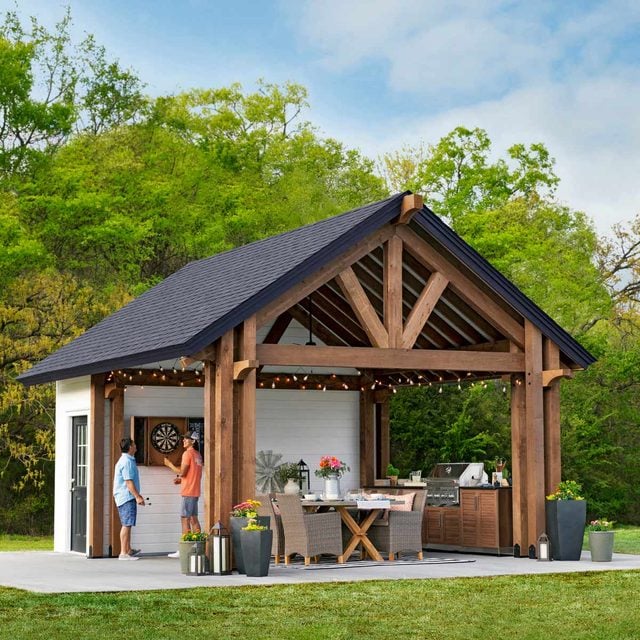
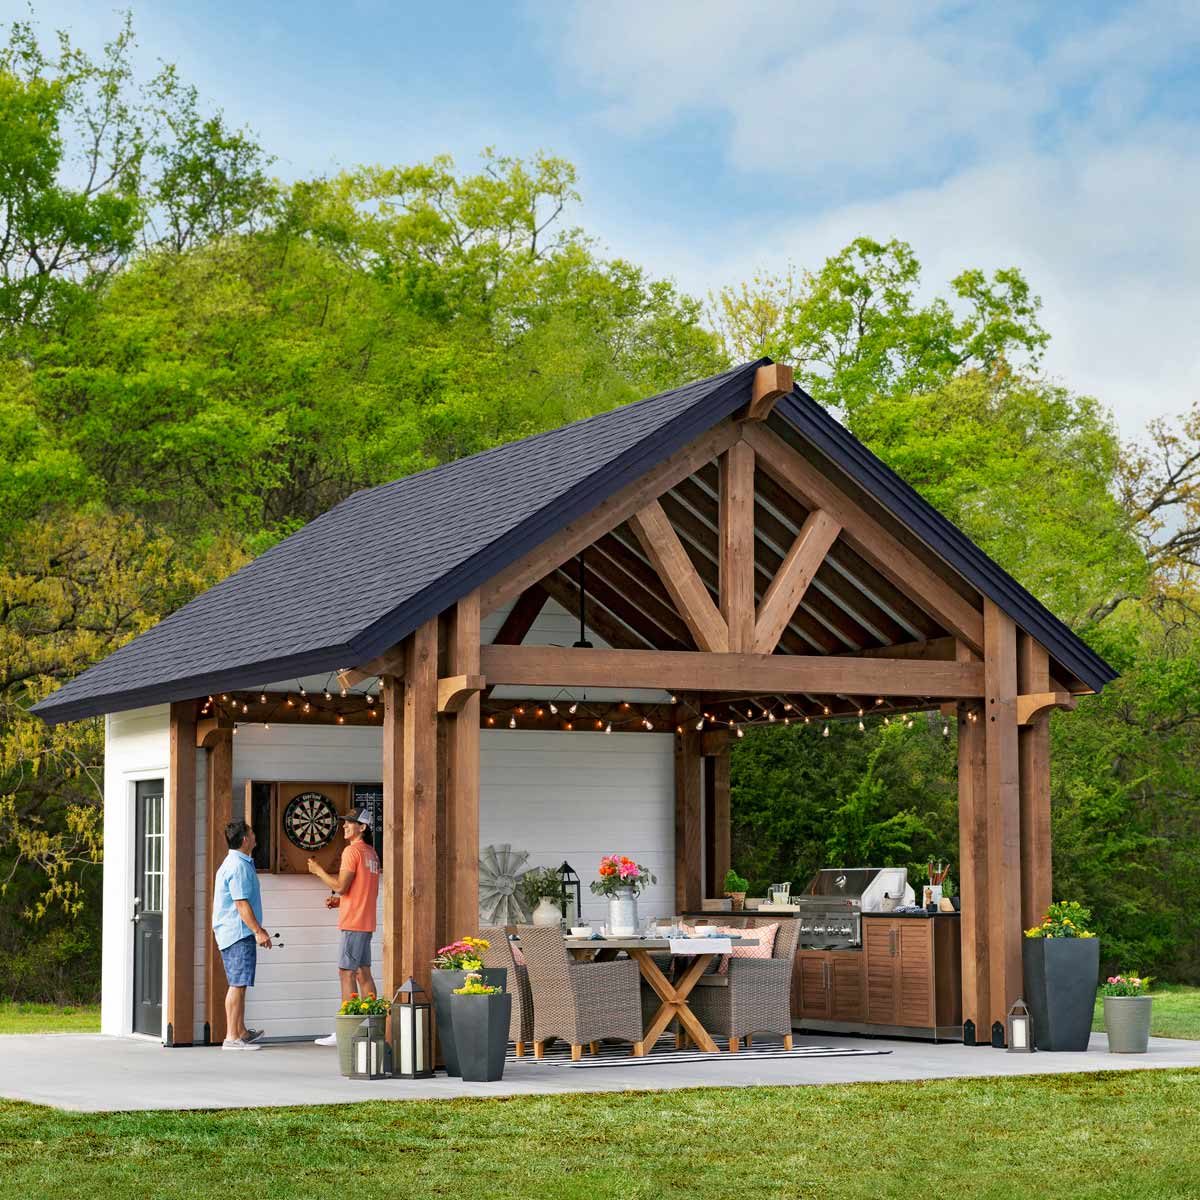
The perfect blend of entertaining space and storage shed.
Introduction
With its exposed rough-sawn cedar framing and paneled ceiling, this is a beautiful pavilion, perfect for entertaining or just enjoying the outdoors.
Materials, time and tools overview
Our DIY materials cost was about $5,000. We hired a contractor to pour the 30 x 32-ft. slab, which cost another $5,000. This is an advanced building project that requires a lot of attention to detail and experience with layout and complex framing.
Three carpenters and occasional helpers spent eight long days on the construction, while the prepainting and staining work took one person two full days. You’ll need a complete tool arsenal:
- 1/2-in. hammer drill
- Chain saw
- Scaffolding.
Here’s the complete materials list for the outdoor pavilion shed.
Here are the project drawings.
Start with a flat slab
You could go with a perfectly level slab; no slope. But the best slab would be level at the shed area, then slope away slightly so rainwater runs away from the building. Whether you do it yourself or hire a contractor, make sure the building area is flat. Ours wasn’t, and that cost us hours of complicated compensating. A 4-in.-thick slab will be fine, but thicken the slab under the four sets of 6×6 posts to a 4 x 4-ft. area 8 in. deep.
Prepaint and stain everything!
It will take many hours to paint all the siding, trim and ceiling panels and stain the cedar parts. But it’s worth doing before starting construction. It’s a much larger job after the construction is complete, and the finished project won’t look nearly as crisp. You’ll still have touch-up work to do, but that will take only a couple of hours.
Project plans
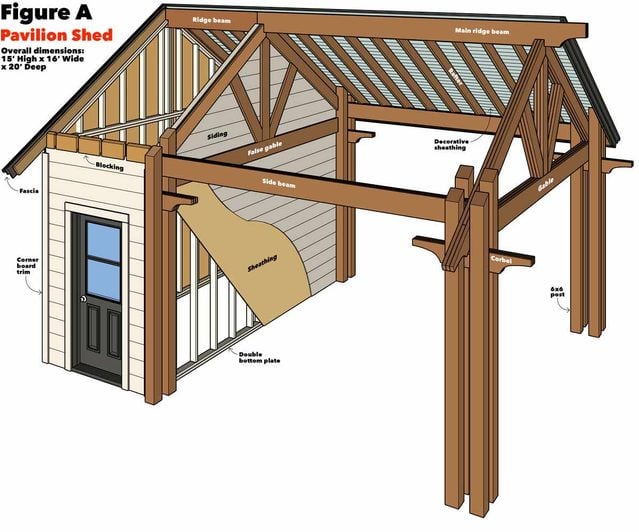
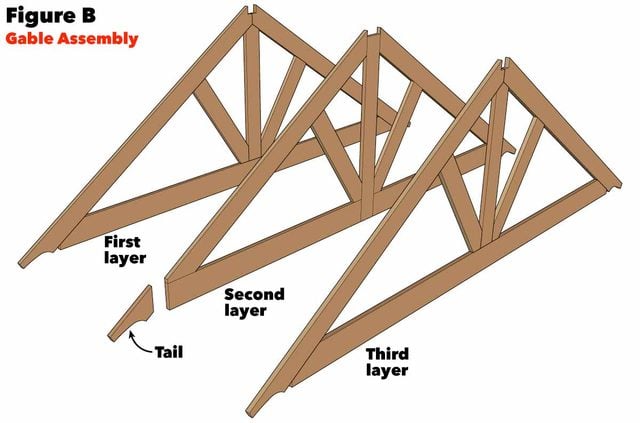
Timber framing simplified
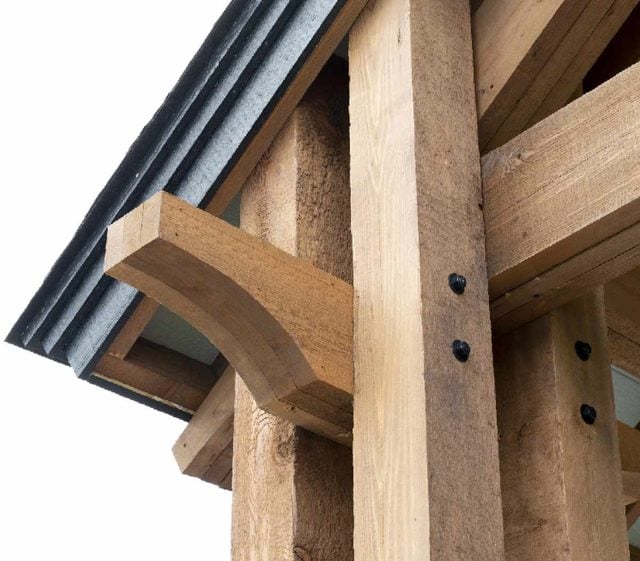
Traditional timber-frame construction requires huge timbers, special tools and rare skills. But we skipped all that. Instead, we got the heavy-timber look for our gable and beams by using three layers of standard framing lumber. This technique requires only basic framing tools and know-how. Better yet, we didn’t have to heave massive parts into position—we just “sandwiched up” lighter materials in place, adding them one at a time.
Watch Pavilion Shed Plans
Project step-by-step (8)
Mark the layout
If your slab is square, with straight edges, you can measure from the edges to lay out the building’s footprint. Otherwise you’ll need to use the 3-4-5 triangle method. Snap lines for the long walls of the shed first, then snap lines for the short sides, extending them all the way out to the post locations, supporting the outside of the pavilion. Those lines will mark the pavilion side of the outside posts. Then snap lines to mark the inside and outside edges of all four pavilion post locations (Photo 1).
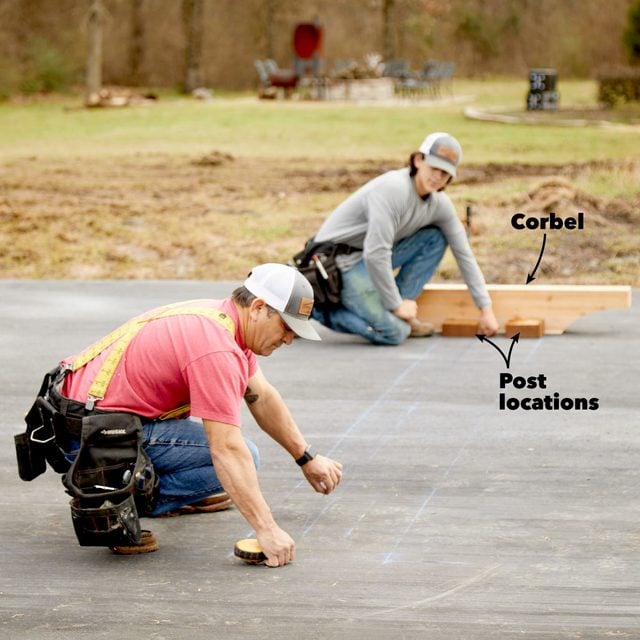
Lay out the footprint
Snap chalk lines outlining the shed walls and extending to the post locations. To mark the post locations, lay out a corbel and some offcuts of the posts. Double-check the accuracy and squareness of your layout; mistakes will waste time and cause frustration later.
Frame the shed first
The shed is all standard 16-in. oncenter framing (Photo 2). You’ll need to buy 10-ft. studs and cut them down to the proper 9-ft. 1-in. heights. You’ll also need to double up the bottom plates (treated on the bottom; untreated above) to get the necessary 1-1/2-in. spacing above the slab for the SmartSide siding. Note that the wall framing includes pockets for the side beams. See all the details at familyhandyman.com/pavilion-shed.
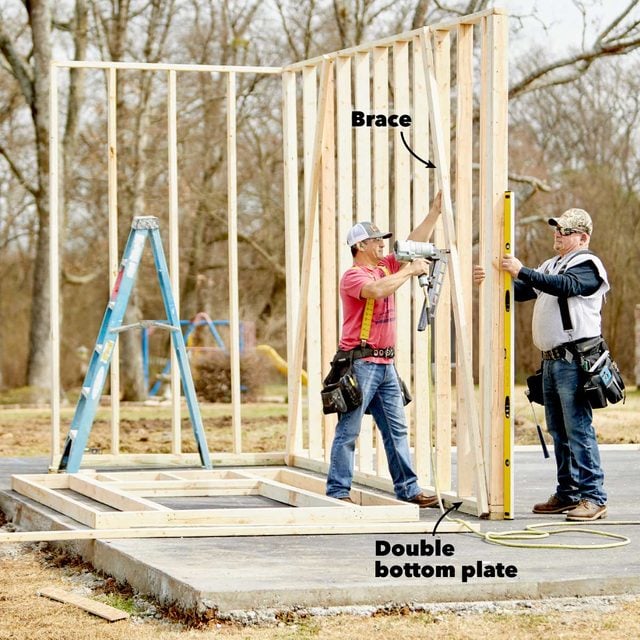
Frame the walls
Build the walls, then plumb and brace them. The walls are standard framing but are more than 9 ft. tall. The bottom plate is doubled so the siding can be raised 1-1/2 in. off the concrete.
Install the side beams
Install only the outer posts closest to the shed for now. Plumb and brace them in both directions (Photo 3). Notch out the top of the triple 2×10 side beams to rest in the beam pockets so they fit under both top plates of the shed while resting on the triple support beam trimmers. Slip them in one at a time, screwing them into the posts and to each other with three stacked 3-in. nails spaced every 12 in. Rest the triple beams on a 2×4 horizontal ledger screwed to the 6×6 posts (Photo 4). Later, they’ll be through-bolted for solid support.
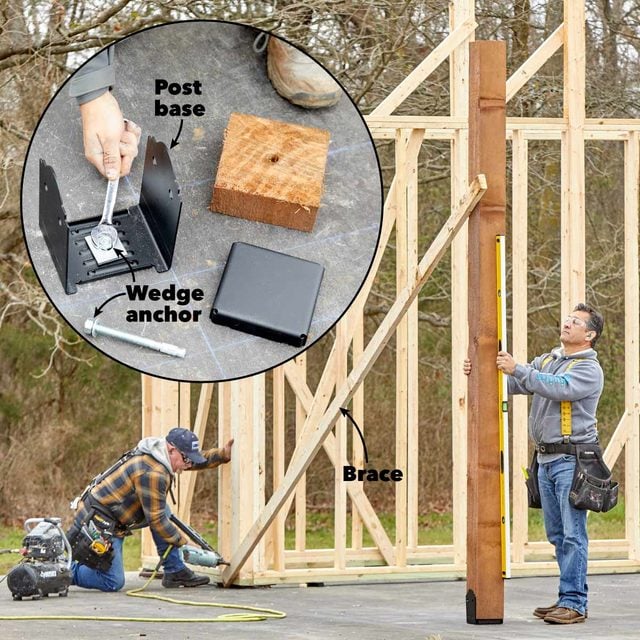
Stand the first posts
Bolt down post bases and stand the rear outer posts—the other posts come later. Brace the posts to the shed. When both posts are up, install a horizontal ledger between them.
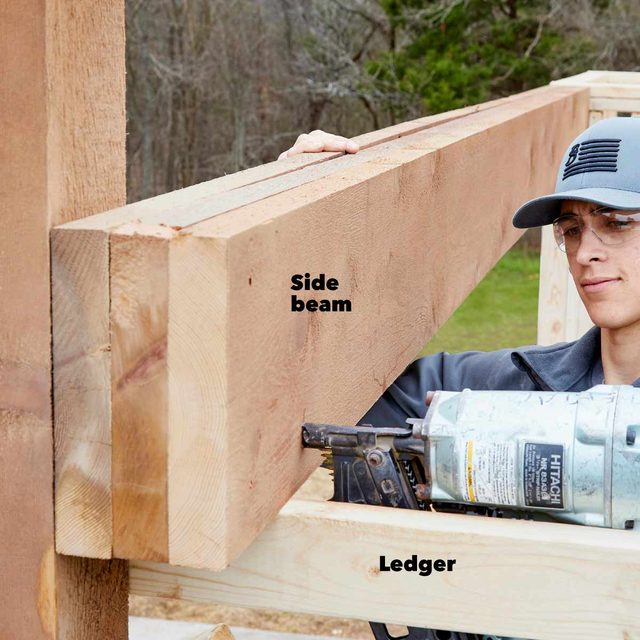
Set the side beams
Each side beam is made up of three 2x10s. Rather than lifting the heavy assembled beams into place, install the 2x10s individually. Rest one end on the ledger, then slip the other end into the pocket in the shed wall.
Set the ridge beams
There are two ridge beams: a short one over the shed and a long main ridge over the pavilion. They interlock directly over the shed wall. Start by cutting and nailing together the triple support studs and then toe-nailing them directly over the longer triple studs below. Brace them in place both directions. Rest the shed ridge beam on the support studs (Photo 5), then add the main ridge beam (Photo 6). Make your life easier at this point by running your tape measure from the top plates of the shed and the side beams of the pavilion to the top of the beams to make sure they’re parallel. That attention to detail will pay off when it comes to the rafter cutting and setting since they’ll all be close to the same.
Cut the gable top plates to fit diagonally against the ridge beam. Then fill in the gable studs, stacking them directly over the shed studs (Photo 7). Hang the door, then sheathe and side the shed—it’s much easier to do those steps now than after the roof is on.
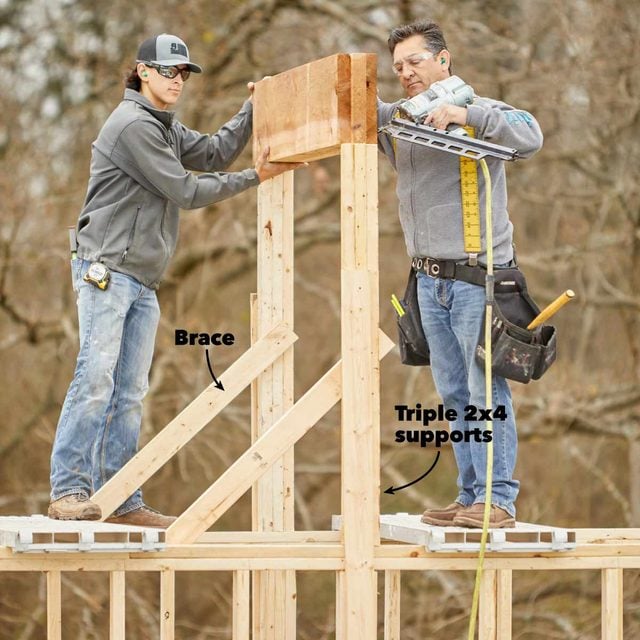
Prop up the shed ridge beam
Build triple 2×4 supports, centered on both shed walls. Plumb and brace the supports. Rest the assembled shed beam on the supports and tack it into place.
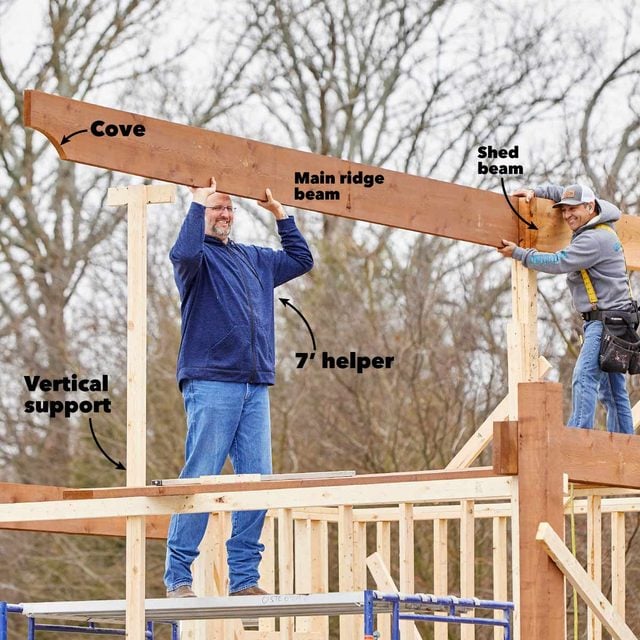
Add the main beam
Cut the decorative coves on the end of each 2×12. Set one end on a vertical support and join the other to the shed beam. Setting beams is easier if you have a 7-ft.-tall helper.
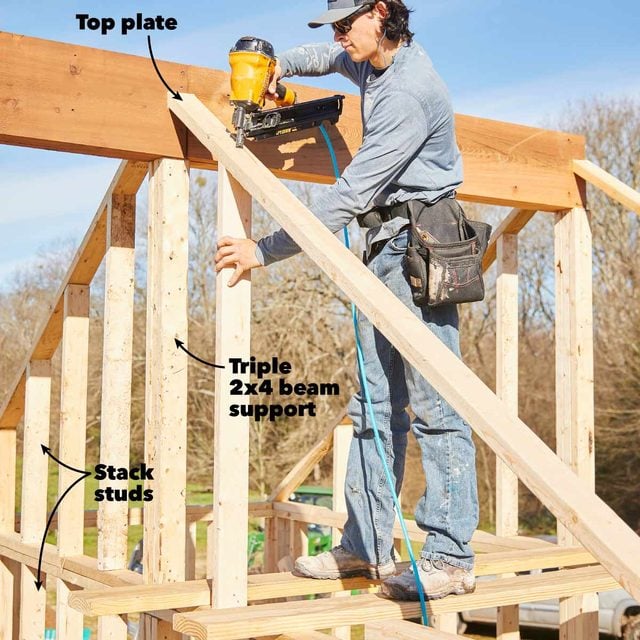
Build the shed gables
Set the top plates of the gables, then fill in with gable studs positioned directly above the wall studs. When this is done, the shed is ready for sheathing, house wrap and siding.
Frame the roof
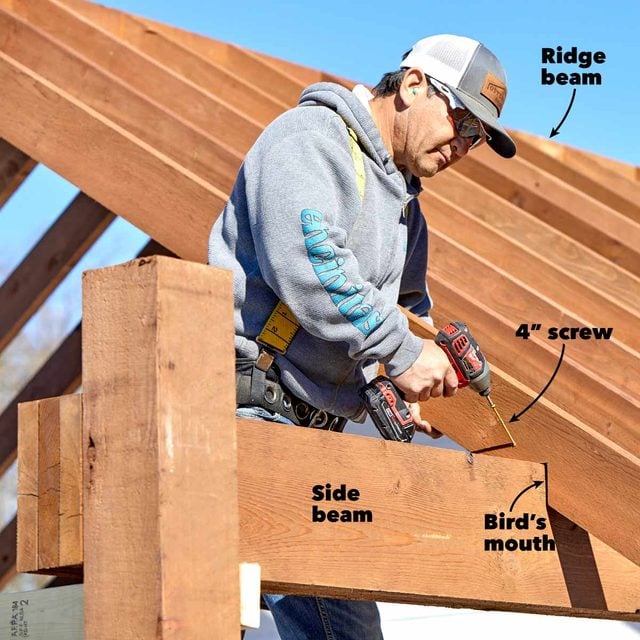
Screw the first two rafters through the siding with 4-in. screws, and use them to lay out the rest of the rafters in each direction. Toe-screw the remaining rafters to the ridge with four 3-in. trim-head screws and to the side beams with three 4-in. construction screws (Photo 9). Cut the end two rafters for both sides, but don’t cut the bird’s-mouths in them. Set them aside for now. You’ll install them after the gable end is complete and the remaining posts are set. Snap a line across the rafter tails 11 ft. down from the ridge (Photo 10) and cut off the ends before attaching the subfascia.
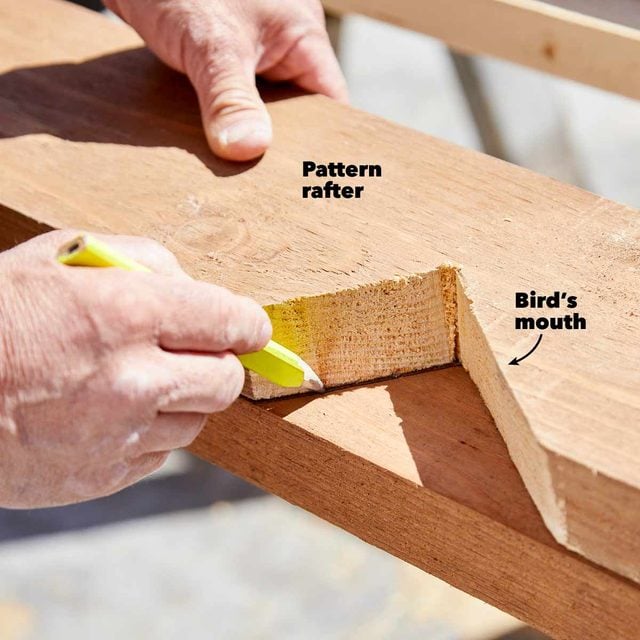
This is where all your attention to detail pays off. Laying out a square footprint and making the side beams parallel with the ridge beam makes cutting the rafters so much easier at this stage. Start with the rafters that adjoin the shed wall. Cut one of the rafters to fit, then use it as a pattern to cut the rest (Photo 8). Mark and cut them one at a time so you can test the fit and make alterations as needed.
Make a rafter pattern
Cut a rafter to fit against the pavilion side of the shed wall. Each rafter has a notch that fits over the side beam. Getting this “bird’s-mouth” cut right will take trial and error. When it’s perfect, use that first rafter as a pattern to mark the others.
Install the rafters
Screw the rafters to the ridge beams and the side beams. The lower ends, or “tails,” of the rafters can run long and vary in length. You’ll cut them to identical lengths later.
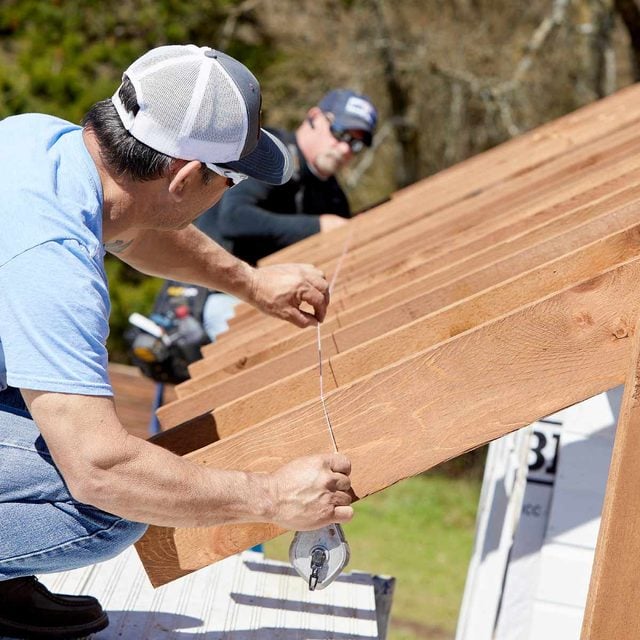
Mark and cut the rafter tails
Snap a chalk line across the rafters 11 ft. from the ridge beam. Cut the rafters at the line. Then screw the subfascia to the rafter tails, running it past the rafters at the pavilion end.
Build the gable
Cut and assemble the 2×6 corbels, then level and toe-screw them to the single posts at each corner post 10-1/2 in. down from the side beams (Photo 11). Further support the corbels with temporary 2x4s before assembling the gable. It looks a little complicated, but by holding parts in place for marking, you’ll find that it’s a simple process of cutting parts and screwing them into place (Photos 12 – 14). We dressed up the gable with some quick router work (Photo 15).
Stand the remaining posts and screw them to the rafters and corbels. Once they’re plumb and secure, cut the tops off flush with the top of the rafters using a chain saw (Photo 16). Then install the remaining rafters. Use an 18-in.- long 9/16-in. auger bit to drill as far as you can. Complete the boring with a 12-in. and 6-in. spade bit extension (coupled end-to-end) with a 9/16-in. spade bit. You’ll only have a couple of inches to bore through to complete the holes. Bolt the assembly together with 20-in. carriage bolts, washers and nuts.
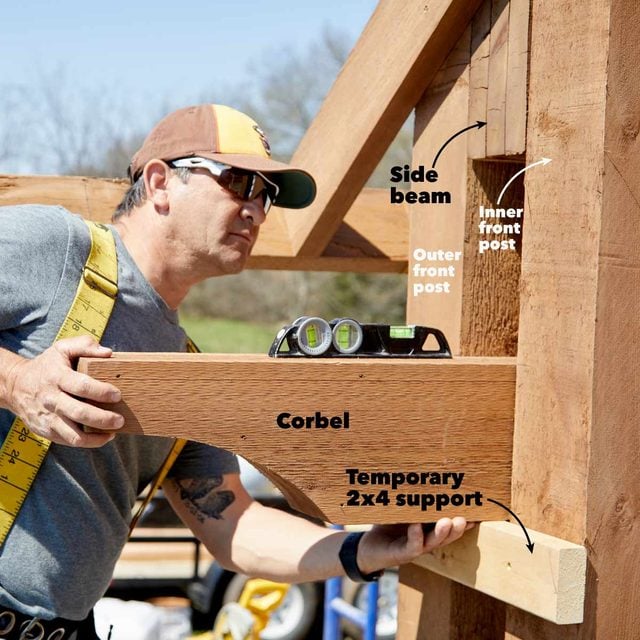
Add posts and corbels
Stand the inner front posts (as in Photo 3) and tie them to the existing posts with a 2×4 support. Then slip in the corbels, level them and screw them into place.
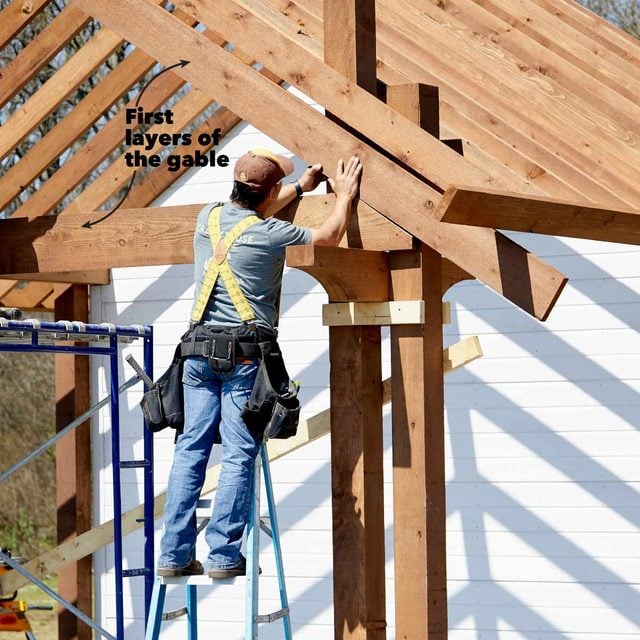
Build the first layer of the gable
The front gable consists of three layers, much like the beams. This gives the pavilion a heavy timber–frame look without timber-framing tools and skills. Test-fit all the parts for the first layer, then remove them and use them as templates for the third layer.
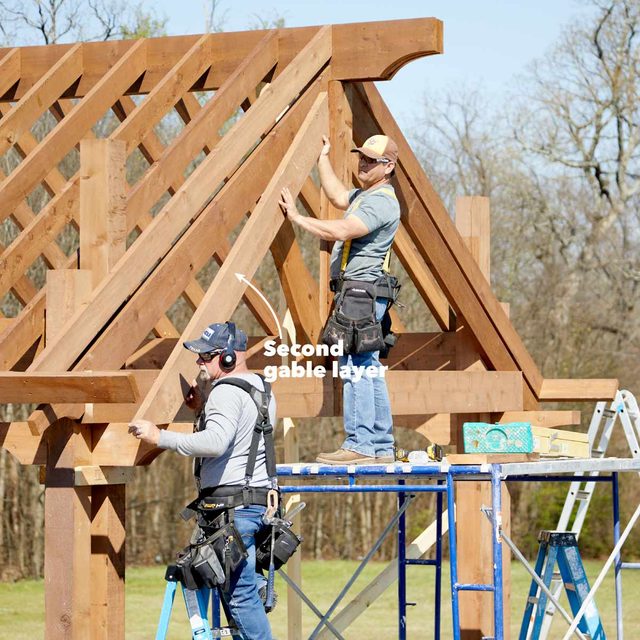
Add the second gable layer
Cut parts to fit over the first layer. The best way to ensure a good fit is to hold them in place and mark them. Note that the “tails”on the second layer are separate parts.
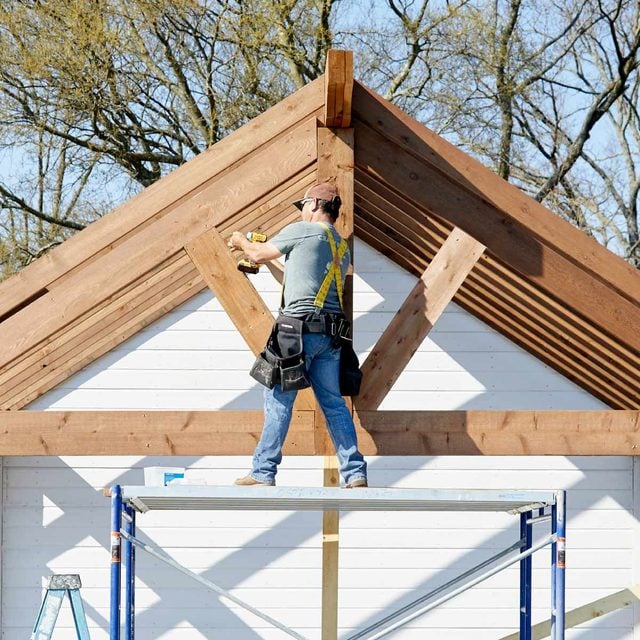
Complete the gable
Screw on all the second-layer parts, then add the third layer, which is identical to the first. This final layer is most visible, so get those joints nice and tight!
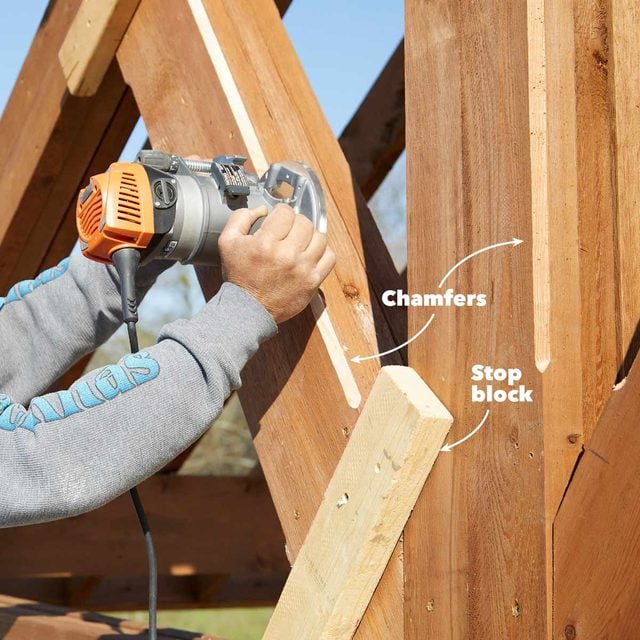
Rout the gable
Screw stop blocks to the gable and cut decorative chamfers with a router and 3/4-in. chamfer bit. We chamfered only three parts: the center upright and the pair of diagonals.
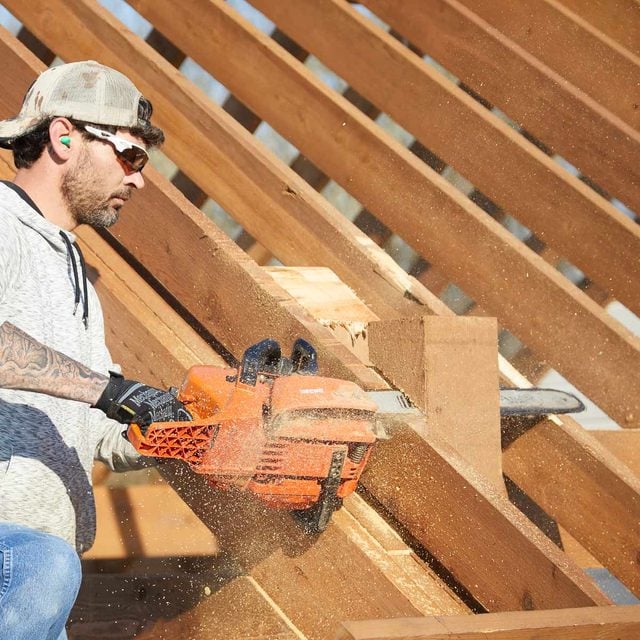
Cut off the posts
Trim the posts with a chain saw, using the rafters as a guide. Then stand the remaining posts and trim them the same way.
Complete the roof
To sheathe the roof, lay the 3/8-in. siding panels face down (Photo 17) and tack them into place. They don’t need many nails because they’ll be covered with 5/8-in. oriented strand board (OSB). Then add the 5/8-in. OSB layer, fastening with 2-3/8-in. nails spaced 4 in. at the perimeter and every 8 in. in the field. Next, install the three-layer fascia (Photo 18), lapping the gable fascia over the eave fascia. Now you’re ready for shingles!
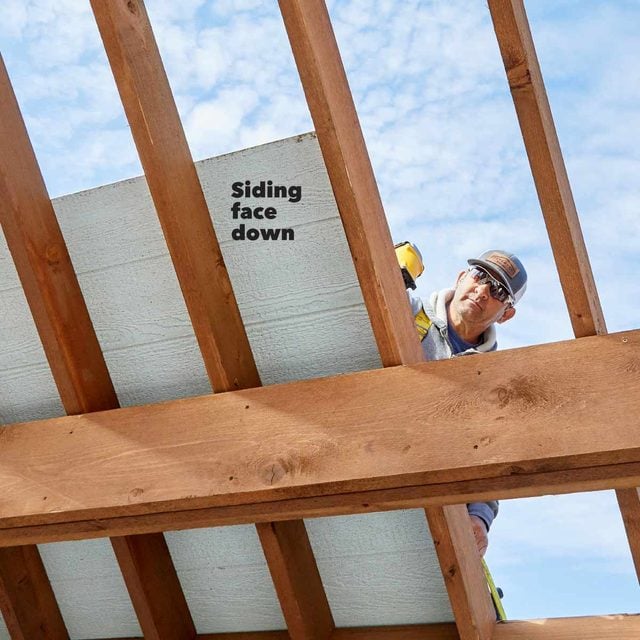
Sheathe the roof
Cover the roof with two layers of sheathing. The first is siding panels laid face down for a decorative ceiling. The second is standard OSB sheathing. Together they provide enough thickness for roofing nails.
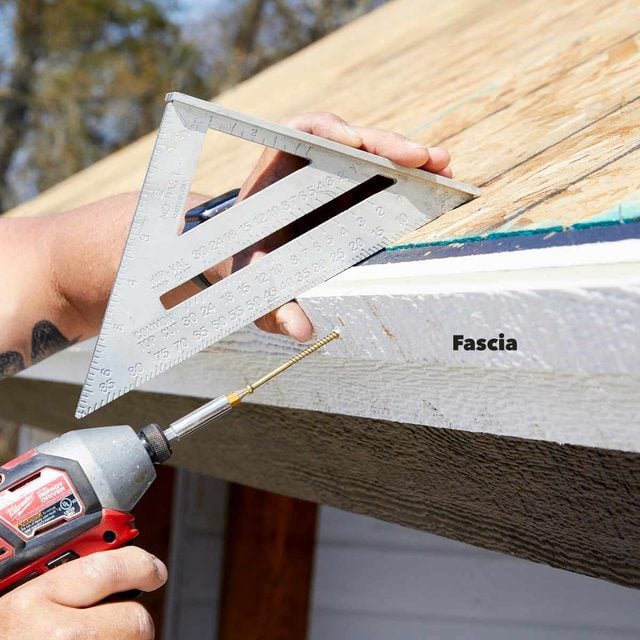
Trim the roof
Nail on three layers of fascia boards flush with the roof sheathing. With this done, the roof is ready for shingles!
Enjoy your new pavilion kitchen shed!
