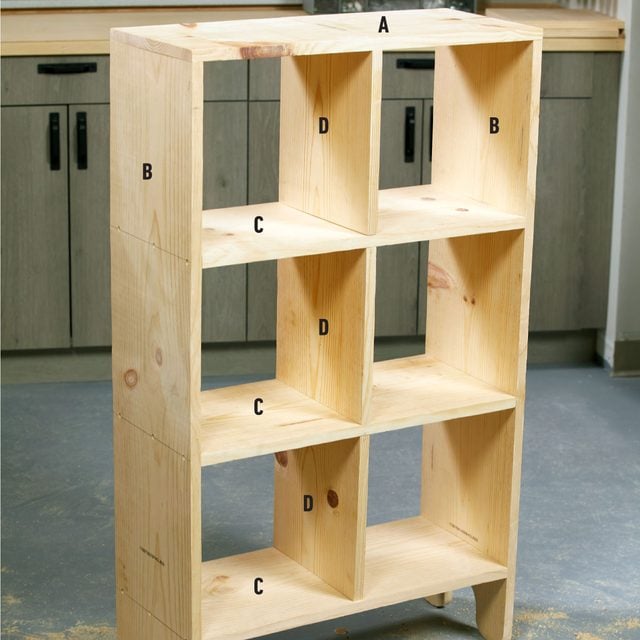
These simple storage cubbies can be customized to fit nearly any room of the house.
Two days
Beginner
$160 - $200
Introduction
Build this cubby storage solution for a closet that could also be a cute centerpiece for your hallway, entryway or bathroom.
Whether you need extra storage in your kid’s bedroom closet or your entryway, a cube cubby storage system is an easy solution that looks great. I added rattan to the back for a customized look that screams boho. I also love using natural elements in my decor, and rattan is a great way to do just that.
Project Overview

Cutting List
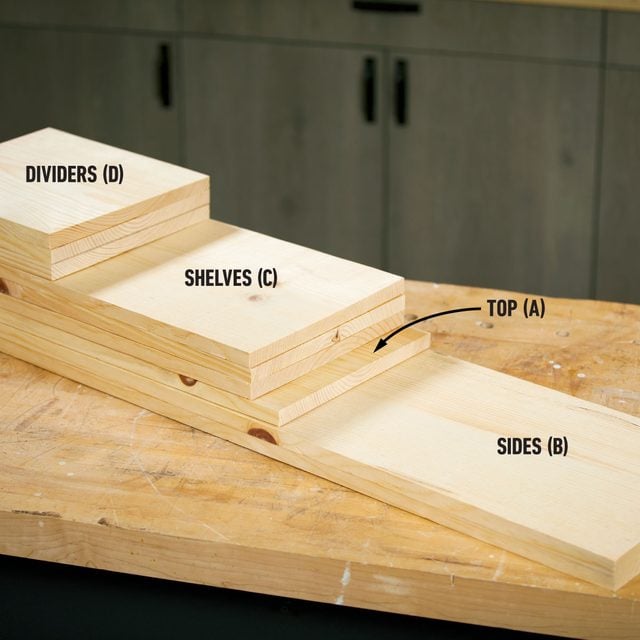
| KEY | QTY. | PART | DIMENSIONS |
| A | 1 | Top | 3/4″ x 11-1/4″ x 26-1/4″ |
| B | 2 | Sides | 3/4″ x 11-1/4″ x 44-1/4″ |
| C | 3 | Shelves | 3/4″ x 11-1/4″ x 24-3/4″ |
| D | 3 | Dividers | 3/4″ x 11-1/4″ x 12″ |
| E | 3 | Long back trim | 1/4″ x 3/4″ x 37-1/2″ |
| F | 2 | Short back trim | 1/4″ x 3/4″ x 26-1/4″ |
| G | 1 | Decorative top | 1-1/2″ x 11-1/4″ x 27″ |
Safety Considerations
During the cutting, sanding, nailing and finishing of the wood components for this project, make sure to wear appropriate eye, ear and dust protection.
Tools Required
- Brad Nailer
- Clamps
- Corner sets or 90-degree clamps
- Countersink bit
- Drill/driver
- Hot Glue Gun
- Jigsaw
- Miter saw
- Nail set
- Orbital sander
- Painting supplies
- Sanding block
- Sanding drum (optional)
- Speed or framing square
- Tape measure
Materials Required
- 1 - 2x12x8'
- 1-1/4" brad nails
- 1-5/8" screws
- 12-inch-long scrap wood blocks to aid in assembly
- 120-grit sandpaper
- 2 - 1/4" x 3/4" x 8' screen molding
- 3 - 1x12x8'
- 5/8" brad nails
- Double-sided tape (carpet tape)
- hot glue
- Paint
- Rattan
- Wood glue
- Wood stain (optional)
Project step-by-step (11)
Cut wood pieces and lay out rattan
Cut the wood pieces and trim from the cutting list above using a miter saw. Take your time at the home center to select straight lumber that’s free of large knots or cracks in crucial locations.
For the rattan, it needs to cover at least 26-1/4-in. by 38-1/4-in. It’s unlikely you’ll find these exact measurements. I had to purchase two pieces of rattan and cut them to fit each side of the cubby. When working with two pieces of rattan, you need the seam to align so you can hide it behind a shelf or divider, which can be challenging.

Lay out the legs
Use double-sided carpet tape to adhere both side pieces (B) together so they can be cut at the same time. You can draw the leg shape from the above directly onto the 1- by 12-ft. board, or draw it onto a piece of paper and transfer it.
- The legs should be four inches tall from the top of the middle arch to the bottom of the leg.
- The board is 11-1/4-in. wide, so each leg is four inches wide with a two-inch radius on each side and a 3-1/4-in. wide middle arch.

Cut the legs
- Clamp the wood sides (B) to the table and use the jigsaw to cut out the legs.
- Pro tip: Don’t cut on the line; cut outside it. This way, when it’s time to sand, you know where to stop. This will keep the legs uniform.
- Use an orbital sander and drill sanding drum to smooth the edges. If you don’t have a drum sander, a sanding block works just as well. Check both sides to make sure they’re smooth.

Dry fit the materials together
- Lay the cubby on its back and use woodworking clamps to secure the pieces together.
- Use corner sets to make sure everything’s square and fits. I like using the large quick grips to see how the form looks from top to bottom.
- Use the dividers (D) and a 12-inch scrap of wood to make sure everything lines up. Once it looks good, start putting it together.

Glue, pin and screw together
I used glue, 1-1/4-inch brad nails and countersunk 1-5/8-inch screws to build the storage cubbies. Use the glue and nails to get everything aligned and flush, and the screws to hold it together. Work quickly; wood glue sets up in about 30 minutes. And keep a damp rag handy to clean squeeze-out.
To assemble the cubby casework:
- Glue and nail the top (A) to the sides (B) so its outside edge is flush to the outside face of the sides (B).
- Glue and nail the bottom shelf (C) to the sides (B) so the bottom of the shelf sits six inches from the bottom of the legs you already shaped.
- With the outer rim of your casework nailed together, check that it’s square. Countersink and screw the top (A), sides (B) and bottom shelf (C) together.
- Use the loose dividers (D) as spacers to determine the placement of the interior shelves (C). Glue and nail them in place.
- Center and attach the dividers (D) to the casework by gluing and toe-nailing them through the front and back edges, and into the shelves below/above.
Pro tip: Using a brad nailer to toe-nail diagonally can be a pain. If a nail doesn’t go in all the way, no problem; use a nail set to bury it into the wood.

Fill with wood filler
Fill screw holes, nail dents, knots and other inconsistencies with wood filler. Wood filler will usually shrink, so don’t be afraid to over-fill. It’s better to sand it down than add more filler after it dries. Let this dry overnight and sand it smooth before painting.

Paint cubby and trim
Paint with the grain, if possible. Use a roller to cover to paint the majority and a paintbrush to get the corners. I went with Sherwin-Williams 6433 Iverness paint because I wanted some color without making the piece overly flashy.

Prep the rattan
- While the paint dries, prep the rattan.
- Read the instructions on the rattan you purchased.
- Our rattan needed to be soaked for 10 to 15 minutes before unrolling. This removed dirt and make it more flexible.
- Once soaked, unroll it on its back so it can dry flat — but not completely. You want it to be damp as you glue the rattan to the back of the cubby. This will keep it flexible and allow it to be stretched straight. This will also be helpful if you have two pieces of rattan you’re unrolling on each side. The flexibility will help the rows line up and look from the front like it was one whole piece.
(Note: While I was working on it, I let the rattan get too dry, and it lost its flexibility. I panicked and started cutting it into sections to make sure everything lined up, but I should have just thrown it back into the bath.)

Glue the rattan to the back and pin trim
- Once the paint dries on the storage cubbies, hot glue the edges of the rattan to the back edges of the cubby. Start in the upper corner and make your way down to make sure the rows and columns look as straight as possible. Press the glue down so it doesn’t bulge. You don’t want to make hills and valleys in the trim once that’s in place.
- Trim the rattan so the edges are flush to the cubby.
- Nail the short (F) and long back trim (E) around the edges of the rattan for a secure hold. Use the 5/8-in. brad nails for the trim and scale back the depth adjustment of the brad nailer. If it’s too high, the nail will blow right through the trim.
- If you decide to seam the rattan pieces together down the back of the dividers (D) as I did, use a long trim piece (E) to cover the seam.

Finishing touches
Once the storage cubbies are together, touch up the trim and rattan edge with paint. This will hide any gaps caused by bulky parts of the rattan. If the gaps are large, you could add wood filler or cover with an extra piece of trim. (I found painting did the trick.)
Depending on the use for the cubby, you might want to add a proper top (G). I stained a thicker piece of 2×12 prime lumber to bring out the natural elements of the rattan. I cut the top about 3/4-inch longer than the sides of the cubby so it would stick out a little, then centered it on top. Stain the top piece with a wood finish. We used Early American 230.
Once it’s exactly where you want it, pre-drill and countersink four pilot holes into the underside of the top piece (A) of the cubby. Then use the 1-1/4-in. wood screws to secure it down.
If you have kids you can secure this to the wall for added safety
FAQs
How do I make my cube storage look expensive?
Adding a top will definitely elevate your cubby storage and make it the perfect focal point in an entryway. Besides staining the wood top, adding wood or hairpin legs will also take this piece to the next level.
In our example, we used rattan to create a boho vibe, but adding any interesting back can also make your piece look more custom for your home. So can doors with delicate handles.
How do you secure cube shelves?
Add angle brackets and secure them to a stud in the wall behind the shelves. If a stud isn’t available, use a wall anchor for extra grip into the drywall.
Is it cheaper to make your own shelves?
That depends on the type of shelf.
Prefabricated cubbies made of particleboard can be cheaper. But once you start to add things like legs, tops, doors or backings, the price can really add up, and you still won’t have something 100% custom built.


