Build a cozy haven to escape everyday hustle and bustle with these porch swing plans.
Two days
Intermediate
$400-$500
Introduction
Stylish and easy to construct, this DIY porch swing is sure to have you relaxing in style all summer long.
Simple cuts and a no-hassle glue-and-screw assembly technique make this swing a great first-time woodworking project. We designed the swing with a unique suspension system made from 1/2-in. galvanized steel pipe slipped through the swing frame to act as a cradle and eliminate stress on wood joints. We then fastened eye bolts through the steel pipe and covered the pipe ends with soft rubber caps to prevent scrapes. Welded steel chain supports the swing assembly, securely fastened to solid framing in the roof of your front porch, pergola or pavilion.
When selecting a wood for this outdoor project, stay away from cedar, redwood and soft pine. They’ll mar easily and they won’t hold screws as well as other, denser woods. Instead, go with fir, southern yellow pine, cypress, poplar, white oak or maple. Oak and maple are harder to cut, sand, drill and screw, so avoid them if you’re a first-timer. We chose poplar because it’s strong, readily available, easy to work with and takes paint well.
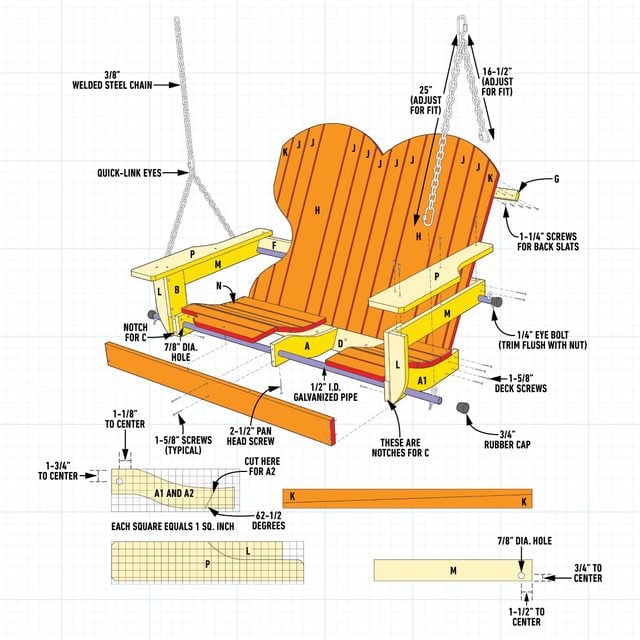
Figure A

Overall Dimensions: 39″T X 51-5/8″W X 29-1/2″D
Cutting List
| KEY | QTY. | PART | DIMENSIONS |
| A1 | 2 | Side seat braces | 3/4″ x 5-1/2″ x 17-1/2″ |
| A2 | 1 | Center seat brace | 3/4″ x 5-1/2″ x 15-1/2″ |
| B | 2 | Front arm braces | 3/4″ x 3-1/2″ x 10-1/2″ |
| C | 1 | Front stringer | 3/4″ x 3-1/2″ x 43″ |
| D | 1 | Rear stringer | 3/4″ x 3-1/2″ x 40″ |
| E | 1 | Lower back brace | 3/4″ x 3-1/2″ x 40″ |
| F | 1 | Center back brace | 3/4″ x 2-5/16″ x 43″ |
| G | 1 | Top back brace | 3/4″ x 1-1/2″ x 40-1/2″ |
| H | 2 | Center back slats | 3/4″ x 5-1/2″ x 35″ |
| J | 9 | Back slats | 3/4″ x 2-11/16″ x 35″ |
| K | 2 | Tapered back slats | 3/4″ x 1-13/16″ x 35″ |
| L | 2 | Arm supports | 3/4″ x 2-1/2″ x 10-1/2″ |
| M | 2 | Horizontal arm supports | 3/4″ x 3″ x 22-1/4″ |
| N | 6 | Seat slats | 3/4″ x 2-11/16″ x 41-1/2″ |
| P | 2 | Arms | 3/4″ x 5-1/2″ x 27″ |
Tools Required
- 4-in-1 screwdriver
- Adjustable wrench
- Block plane
- Caulk gun
- Circular saw
- Countersink drill bit
- Drill
- Drill bit set
- Hacksaw
- Half-round file
- Jigsaw
- Miter saw
- Orbital sander
- Paintbrush
- Sanding block
- Square
- Table saw
Materials Required
- #8x2" sheet metal screws
- 1-1/4" galvanized deck screws
- 1-5/8" galvanized deck screws
- 100- and 150-grit sandpaper
- 12 - 4" x 1/4" lag screws
- 2 - 4" x 3/4" closed eye screws
- 2-1/2" pan head screws
- 20 ft. - 3/8" welded steel chain (zinc-plated or galvanized)
- 3 - 1x4x8' poplar
- 4 - 1/4" eye bolts
- 4 - 3/4" rubber caps
- 51" - 1/2" galvanized pipe (no threads)
- 56" - 1/2" galvanized pipe (no threads)
- 7 - 1x6x8' poplar
- 8- 2-1/4" quick-link eyes
- Construction adhesive
Watch How to Build a Porch Swing
Project step-by-step (15)
Cut slats
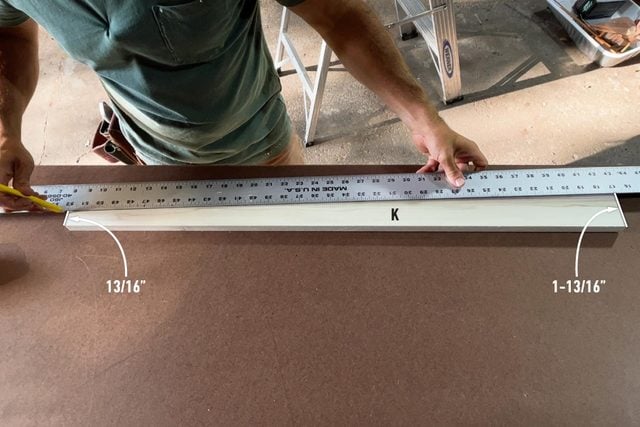
Using a table saw, make eight 1×3s by ripping four 1×6 boards to 2-11/16 in. Cut the boards to length for the seat (N) and back slats (J). Mark a diagonal taper onto a 1×3. Use a jigsaw to cut along the line, making the two outer slats (K). Use a block plane to smooth the cut edges.

Rip back braces
Set your saw at 27-1/2-degrees and rip the pieces that make the center (F) and top back braces (G).

Cut curved pieces
Draw a one-inch grid directly on the wood for the side (A1) and center seat braces (A2) and arms (P) (see Figure A). Use the grid to copy the curves. Clamp the seat support parts to the workbench as you cut the curves with a jigsaw. Sand along the curves with 100-grit sandpaper. Use a sharp spade bit to drill 7/8-in.-dia. holes into parts A1 and A2 for the front pipe hanger.

Assemble front arm supports
Notch the front arm braces (B) with a jigsaw to accept the front stringer (C). Drill pilot holes and countersink them. Apply a dab of construction adhesive at each joint. Fasten with 1-5/8-in. deck screws.

Attach rear stringer
Trace the angle of the center seat brace (A2) onto each side seat brace (A1) to get the proper positioning of the rear stringer (D) fastening points. Again, drill pilot holes and glue and screw the seat braces to the front stringer and the front arm braces. Next, glue and screw the rear stringer to the seat braces.

Fasten the back slats
Lay all the back slats face down on a flat surface and slip temporary 1/4-in. spacers between the slats. Fasten the bottom brace (E) to the middle slat, using a framing square to ensure they’re joined at 90-degrees.

Cut the top curves
Trace the top curves on the front side of the back assembly using a homemade beam compass. Nail one end of the compass 14-in. from the top and in the center of the 1×6 back slat. Insert your pencil into the1/4-in. hole drilled in the other end of the compass. Cut along the mark with your jigsaw.

Join the back and seat assemblies
Hang the lower part of the back assembly over the edge of your work surface to make room as you slide the seat assembly onto it. Align the rear stringer of the seat assembly with a mark drawn 2-1/2-in. from the bottom of the back assembly. Glue the joint, then clamp and screw the assemblies together.

Fit the pipes
Cut and drill the pipes (Q and R) and slide them into the holes. File the inside of the 7/8-in. hole in the arm support (M) with a coarse half-round file if the support pipe won’t easily slide through. The rear support pipe should fit snugly under the center back brace (F) as it protrudes through each arm support.

Add screws for stops
Drill a 3/16-in. hole in the center of the rear support pipe, then screw a 2-in. #8 sheet metal screw (use a 1/8-in. pilot hole) up into the center back support. This connection will keep the pipe from sliding to one side while the swing is swinging.
With the pipes in place, drill a 9/32-in.-dia. hole one inch from the end of each pipe for the eye bolts. Angle them slightly toward the center of the swing to minimize the torque on the pipe and prevent the bolts from breaking.
Note: During the final assembly, squirt thread-locking compound on the eye bolt threads. Cut the eye bolts flush with the nuts and add rubber caps to the pipe ends for safety.

Install seat slats
Attach the six seat slats (N) to the seat braces (A1 and A2) by predrilling and screwing them into place with 1-5/8-in. deck screws. Use a countersink bit to ensure the heads are sunk below the seating surface. Attach the seat slat at the base of the seat tight against the back slats (H and J). Space the remaining slats so the gaps between them are even (around 1/4-in.) and the front seat slat overhangs the front stringer (C) by 1/2-in.
Note: A few slats may touch due to the shape of the seat.

Even out high spots
Because the seat curves, the slat edges can ride high in some areas, making for an uncomfortable ride. Smooth any high spots in the seat slats with an orbital sander. Then sand the entire swing with 150‑grit sandpaper.
The swing is now ready for any exterior wood stain, paint or finish (we used a semitransparent exterior stain). Wipe off the dust and vacuum the swing, then use a brush or roller to apply.

Hang swing on porch
Hang the porch swing securely using special quick-link eyes to join the lengths of chain. The swing should tip back slightly at the arms, about 1 in. from back to front, when at rest.

Install the swing
Screw a length of treated 2×4 into solid framing to support each chain. Be sure to use 4-in.-long lag screws and span at least three ceiling joists on your porch.

FAQs
How much does it cost to build a porch swing?
Depending on the materials, you could build a porch swing out of pine for as little as $200 or spend as much as $1000 if you constructed it with teak or another exotic, weather-resistant hardwood.
How high should a porch swing be off the ground?
It depends on how much swing you desire in your porch swing. If you intend to use it primarily as seating, the seat top should be 17-to 19-inches off the porch floor or deck boards; up to 23-inches if you wish to have a little bit more swinging movement.
How hard is it to make a porch swing?
A porch swing is a simple project that most beginner or intermediate woodworkers can complete with the appropriate tools.


