With special framing and insulating techniques, your basement can be as comfortable as any other room in your home. Find out more about insulating basement walls and framing basement walls here.
Multiple Days
Intermediate
Varies
Introduction
Turn your unfinished basement into beautiful, functional living space. Framing basement walls and ceilings is the core of any basement finishing project. Learn how to insulate and frame the walls and ceilings, build soffits, frame partition walls and frame around obstructions.
Your basement can be more than a utility and storage area. With some forethought and good techniques, you can make it as warm, comfortable and inviting as any other room in the house. But, make no mistake about it: Finishing a basement is a big job. In this article, we’ll focus on the framing and some unique problems, such as:
- Finishing against cool masonry walls without creating moisture problems.
- Framing around obstructions like posts, heating ducts and pipes.
- Keeping access to valves and cleanouts.
- Framing and finishing a wall that’s half masonry and half wood frame. You only need basic carpentry skills for framing and one special tool—a hammer drill for concrete fasteners.
Tools Required
- Caulk gun
- Chalk line
- Circular saw
- Drill bit set
- Drill/driver - cordless
- Dust mask
- Hammer
- Hammer drill
- Hearing protection
- Level
- Safety glasses
- Sawhorses
- Speed square
- Stepladder
- Tape measure
- Tool belt
- Utility knife
Materials Required
- 1-5/8-in. screws
- 1/2-in. plywood
- 16d nails
- 2-1/2 in. concrete screws
- 2X2 lumber
- 2x4 lumber
- 3-in. screws
- 8d nails
- Construction adhesive
- Extruded polystyrene insulation
- Fiberglass insulation
- Foam adhesive
- Treated 2X4 lumber
Watch How to Finish a Basement
Project step-by-step (21)
Submit Building Plans
- Make a scale drawing of your plans to submit to your local building inspections department.
- Note: Your plan should include wall dimensions, window and door sizes, and each room’s purpose (e.g., family, bedroom, etc.) along with any special features like fireplaces. Some rooms may require large windows, called “egress” windows, for fire safety. Ask your building inspector if you need them. Also measure the future finished ceiling height and low-hanging pipes or ducts that’ll lower headroom.
- Sketch the details of the exterior wall construction you intend to use as we show in this article.
- Pro tip: If you’re uncertain about the best use of space, hire an architect to help with the design.
- If you choose to do your own electrical work, draw up and submit that plan as well.
- With your plan and permit in hand, clear everything out of the basement and you’re ready to go.
- Pro tip: Walk around the basement with caulk and cans of spray foam and plug every gap you can find between framing and masonry and around pipes or wires that penetrate the rim joist or exterior walls. This is your last chance to seal air leaks from the inside.
Resolve Any Dampness Issues
To tell if walls are damp from exterior water or just condensation from humid interior air, tape a 2-ft. square sheet of plastic to the masonry. If moisture collects on the front of the plastic, you have condensation. The method we show for finishing will take care of that problem. If moisture collects on the backside after a few days, then water is wicking through the foundation wall from outside. The basement should be treated the same as if it were leaky. If you have regular seepage or water puddling after storms (even once every few years), you have to fix it permanently before finishing. Remedies for damp or wet basements can be as simple as rerouting downspouts, regrading slopes away from foundation walls, or applying water-resistant paints to interior surfaces. As a last resort, hire a pro to install perimeter drains and a sump pump. The bottom line is that it’s senseless to spend time and money finishing a basement if leaks or moisture will ruin your work or cause mold to grow. Check out our list of basement floor drains to address these problems.
Insulating Basement Walls
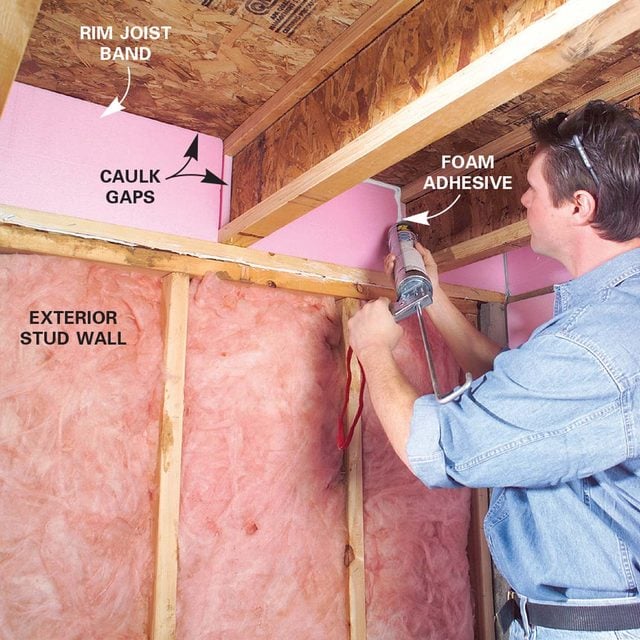
- Start by gluing 3/4-inch extruded polystyrene foam insulation to fit against the rim joists and foundation walls.
- Note: Extruded polystyrene foam can be yellow, pink or blue depending on the manufacturer for insulating basement walls. Avoid “expanded” foam insulation (the type that has little white beads pressed together) when insulating basement walls because it isn’t as durable and has a lower R-value.
- Make cuts by snapping chalk lines to mark and then score it with a utility knife as deep as the blade will penetrate. Then snap the sheet just like you cut drywall.
- Carefully cut around obstructions and fill spaces with small chunks of foam wherever it’s needed, working for tight fits.
- Spread a 1/4-inch bead of adhesive on masonry walls and press the sheets into place.
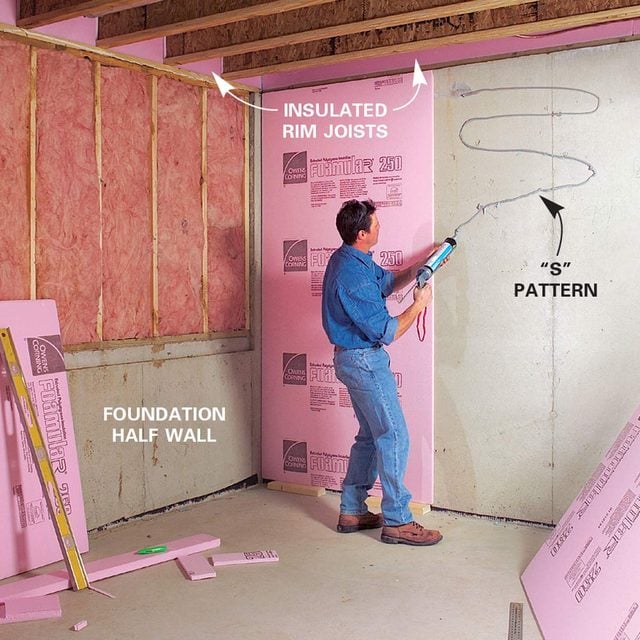
Caulk Gaps
- Caulk seams and gaps between the framing
- Foam along the rim joists with more foam to seal against air infiltration and leaks.
- Note: You’ll add fiberglass later for a higher R-value. The foam greatly reduces heat transfer through the masonry and framing, and it eliminates the need for a plastic moisture barrier later.
- Pro tip: Be sure to use adhesive formulated for use with foam (about $3 per tube) when insulating basement walls. Conventional construction adhesive won’t work for insulating basement walls.
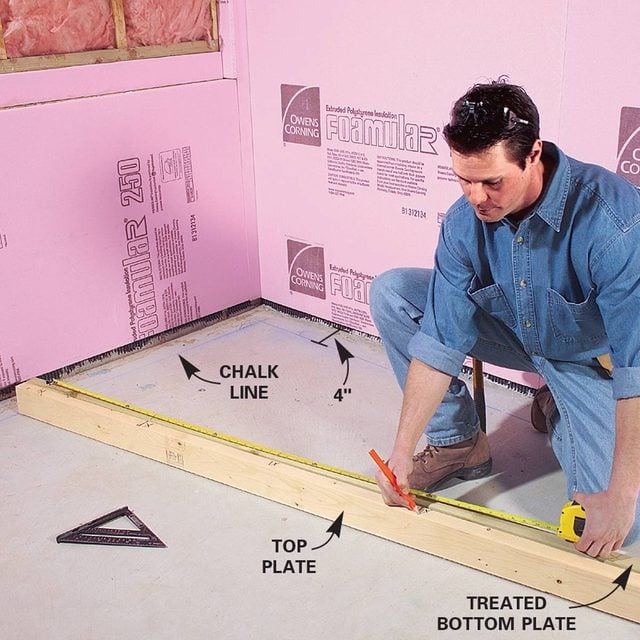
Cut Top and Bottom Plates
- Snap chalk lines 4 inches away from the insulation on the exterior walls.
- Cut 2×4 bottom and top plates and lay out stud locations every 16 inches on each plate as you’re insulating basement walls.
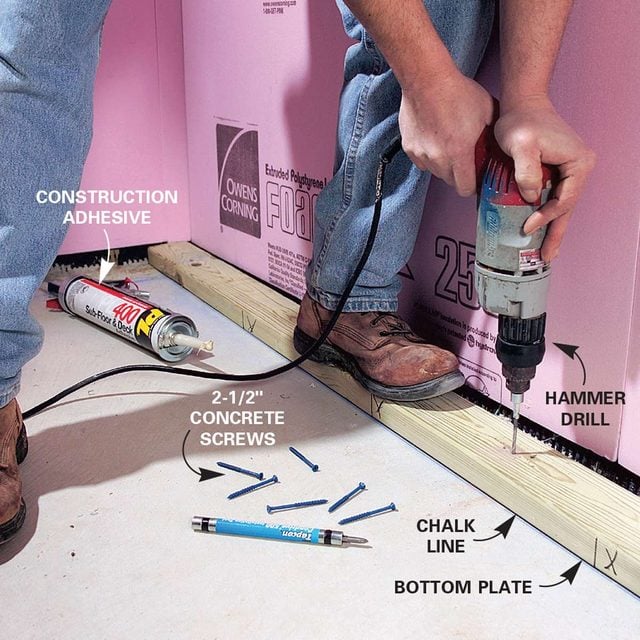
Anchor the Bottom Plate
- Squeeze a 1/4-inch bead of construction adhesive to bottom plates and position them.
- Pre-drill with a hammer drill and anchor them with concrete screws.
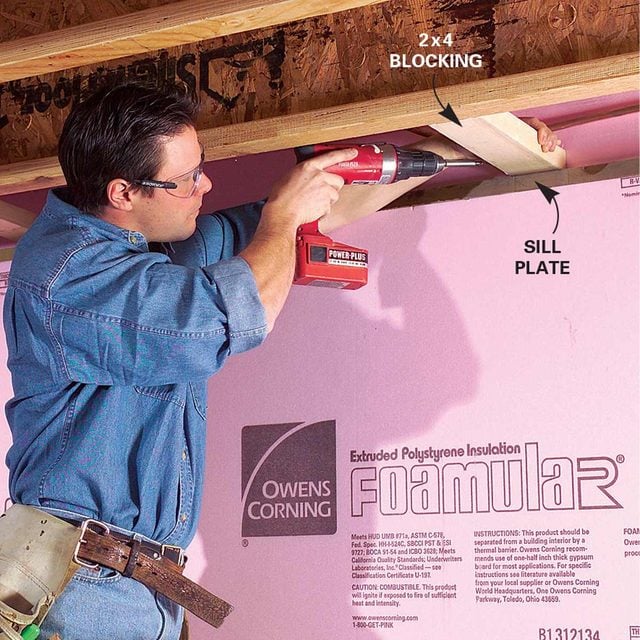
Install Blocking
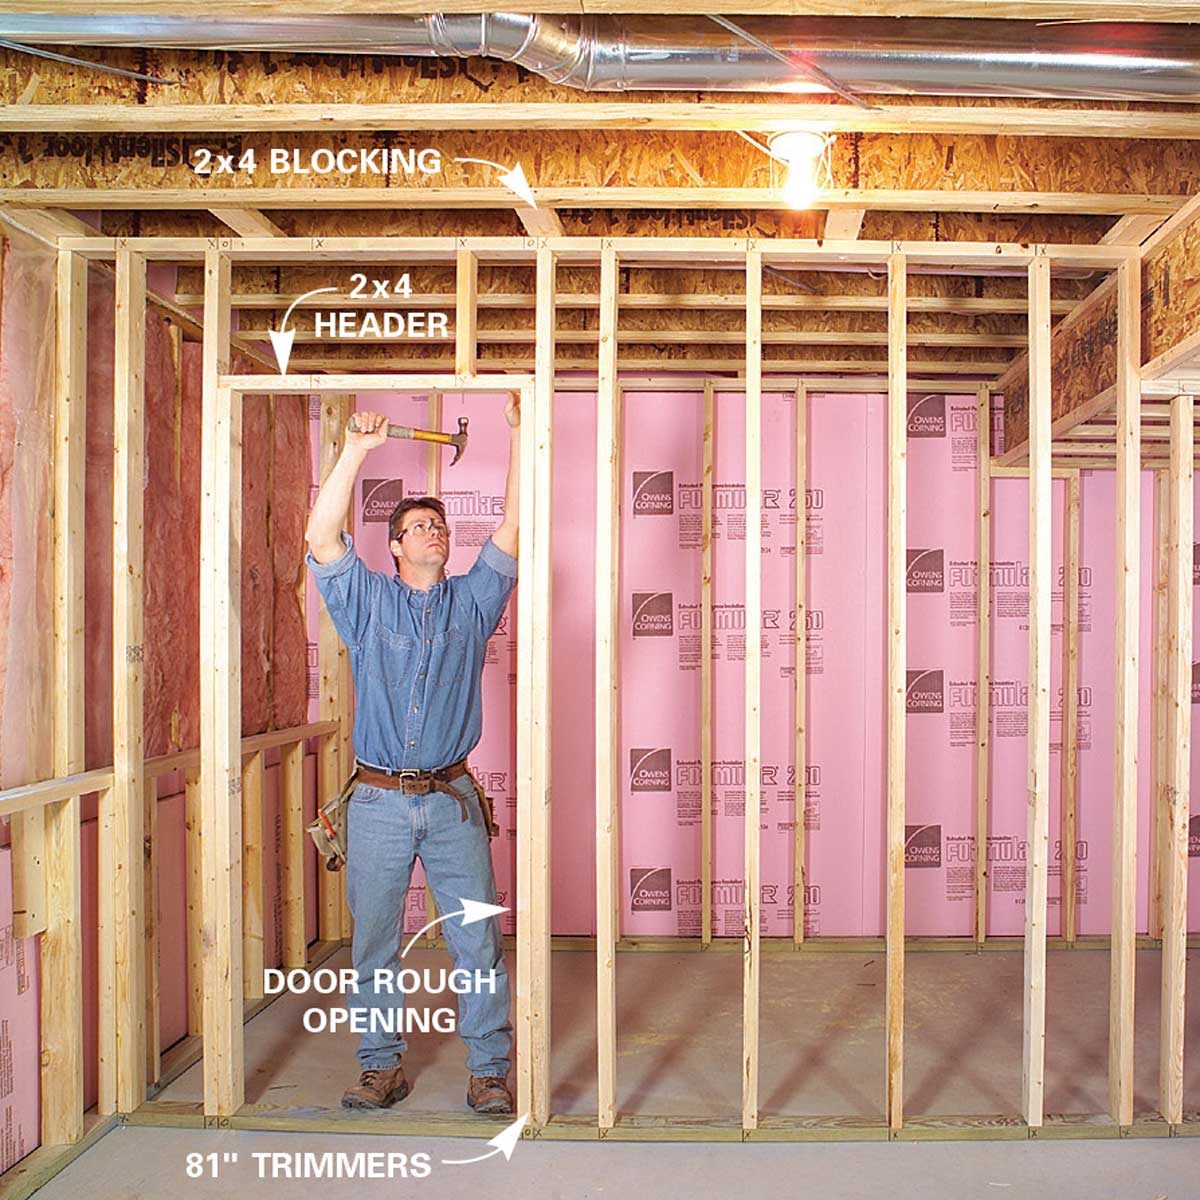
- Nail 2×4 blocking about every 3 feet into the first floor joist to support the top plate.
- Toe-screw them to the rim joist through the foam to continue insulating basement walls.
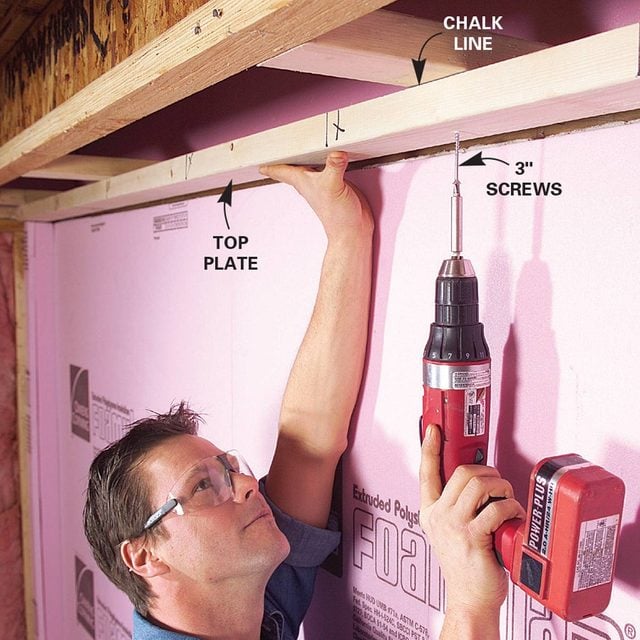
Install the Top Plate
- Plumb from the edge of the bottom plate to the blocking with a straight 2×4 and level.
- Snap a chalk line and screw the top plate to the blocking with 3-inch screws.
Install the Studs
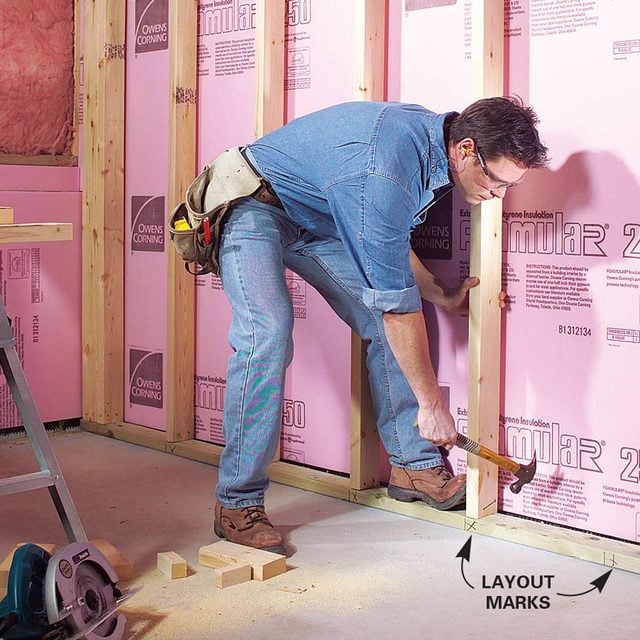
- Measure between the plates at each layout mark and cut each stud to length.
- Toenail the studs into place at the top and bottom with two 8d (2-3/8 inch) nails in one side and a third centered on the other side.
Half-Wall Studs
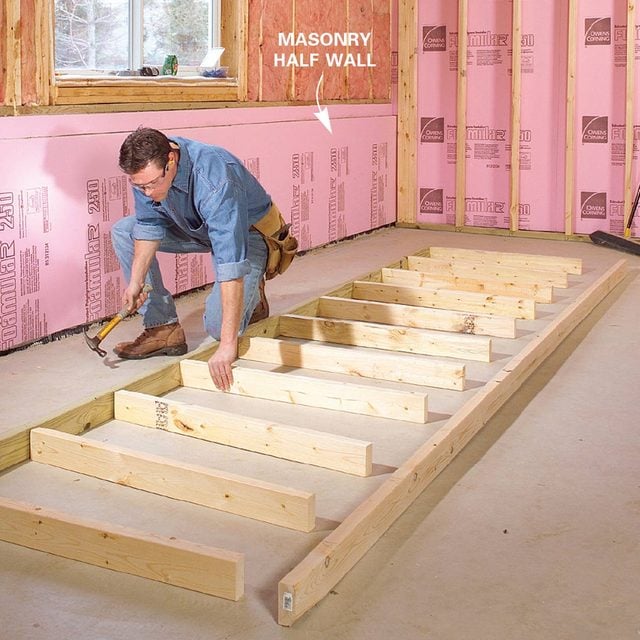
- For framing half walls, make all of the studs the same length and cut them so the wall is slightly taller than the masonry.
- Pro tip: The wall may be uneven because of floor inconsistencies, but you can always sight along the top plate and then shim it until it’s flat before installing the finished top cap.
- Lay out the stud locations on the plate and nail the studs in place with 16d nails.
Install the Knee Wall
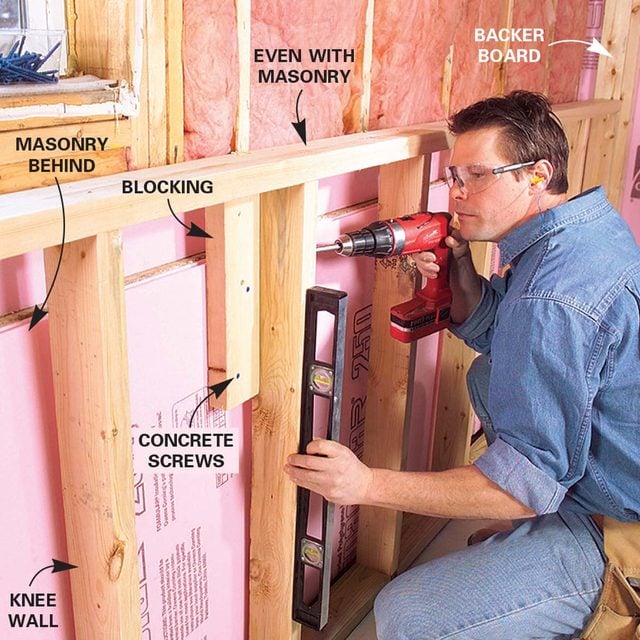
- Tip the knee walls up and fasten them to the floor.
- Fasten blocks through the foam into the masonry at every third stud with 3-inch concrete screws.
- Plumb and screw the studs to the blocking for a solid wall.
- Pro tip: Be sure to sight along its entire length to make sure it’s straight.
Building soffits
Most basements have ductwork and plumbing mounted at the ceiling along an existing wall. Boxing in those pipes and ducts and then drywalling the assembly is the best way to conceal them. The whole structure is called a soffit.
Noise through the ceiling is a common complaint. Avoid trouble and learn how to soundproof your basement ceiling.
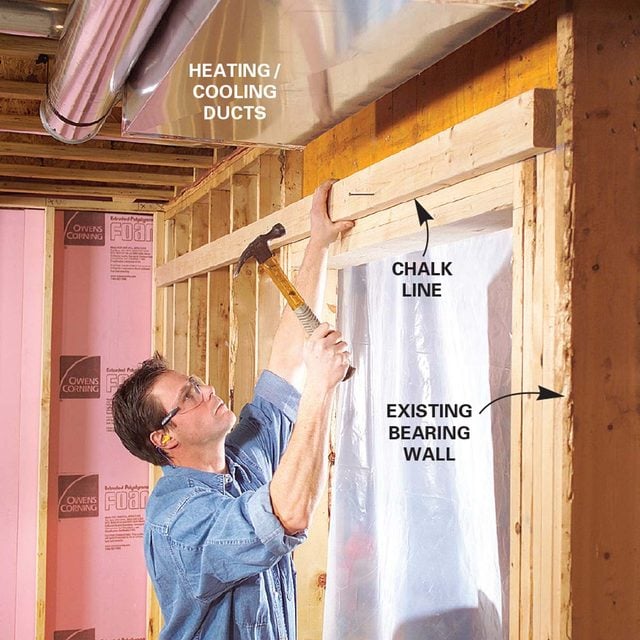
Install 2x4s
- Measure to the floor to find the lowest pipe or duct in the room; that’ll define how low the soffit must be.
- Mark a point 2 inches lower on the wall to allow space for the framing and drywall.
- Nail on a 2×4 nailing strip using the chalk line to position the bottom of the strip.
- Snap another line on the bottom of the joists with a 2-1/2 inch clearance.
Build the Soffit Front
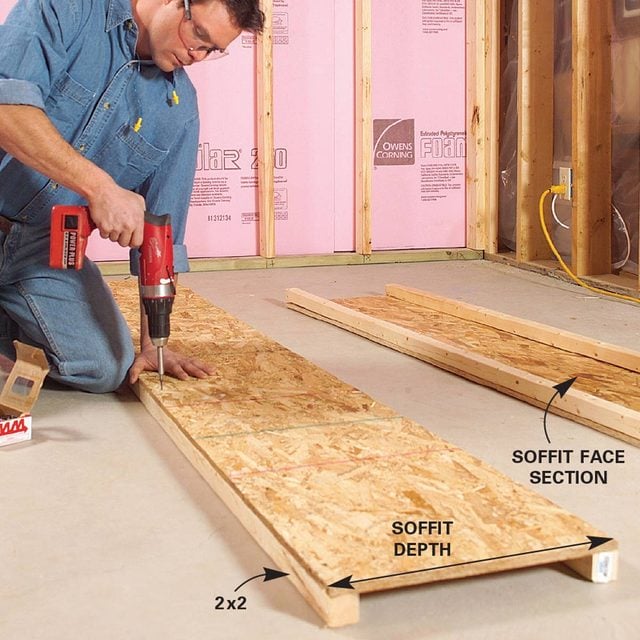
- Rip 1/2-inch plywood strips to the depth of the soffit and screw 2x2s even with both edges with 1-5/8 inch screws.
- Pro tip: It’s easiest to preassemble the 8-foot-long soffit side sections and screw them to the bottom of the floor joists. If soffits end at walls, build the walls first.
Fasten Soffit Assembly
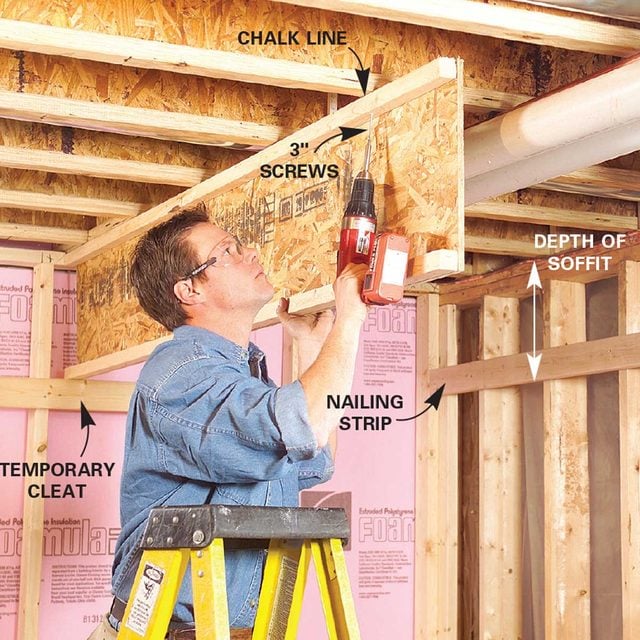
- Snap a chalk line on the floor joists 2-1/2 inches away from the nearest obstruction and parallel to the wall.
- Position the assembly along the chalk line and fasten it to the bottom of the floor joists with 3-inch screws.
Install Lookouts
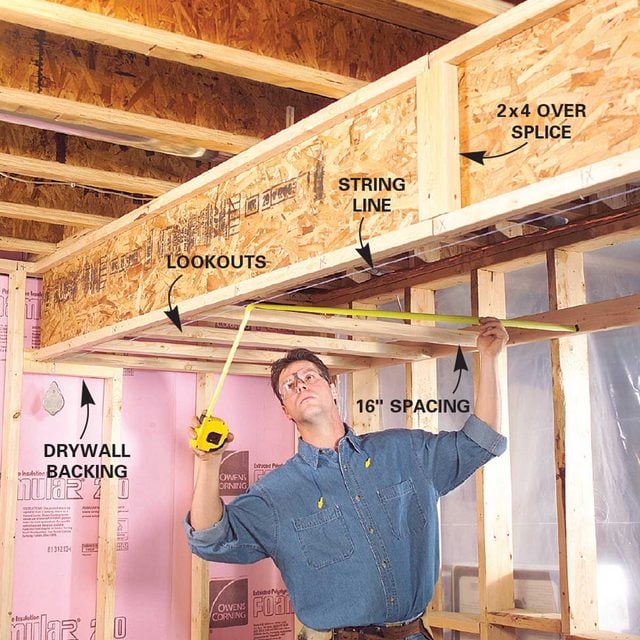
- String a line even with the inside edge of the plywood and use it to determine exact lookout lengths.
- Nail them in place every 16 inches.
Framing partition walls
Partition walls are any walls that aren’t against exterior foundation walls or walls that support floors above. Lay out partition walls by snapping chalk lines to mark both sides of the bottom plates.
Also, in a basement, the top and bottom plates are often different lengths. That’s because top plates may project past foundation walls and be longer or run into soffits and be shorter. When you line up the plates to mark stud locations, be sure to account for differences.
Install Backer Boards
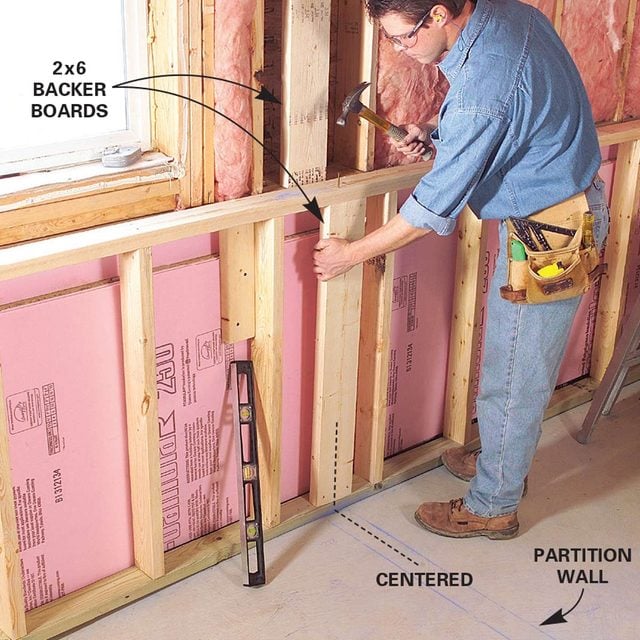
- Mark both sides of partition walls with chalk lines, then center and nail 2×6 backer boards in walls that they join.
- Note: The chalk lines keep you from building walls on the wrong side of single lines!
Cut the Plates
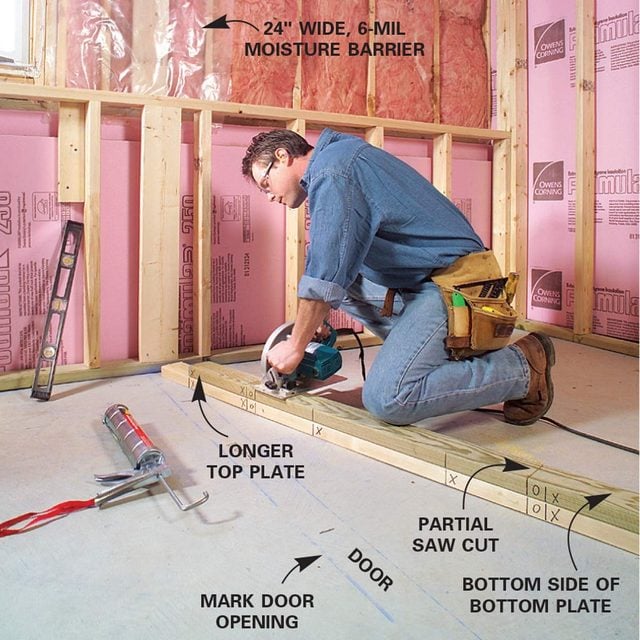
- Mark door openings on the floor to avoid putting glue under doors.
- Frame partition walls as you did the outside walls, installing blocking between joists wherever it’s needed.
- Add 2×6 backers on walls that meet partitions.
- Pro tip: Before you tie the partition walls to exterior stud walls (non-masonry, without foam), staple 2-foot wide strips of polyethylene over the 2×6 backers. That way you’ll be able to seal this type of outside wall with a continuous moisture barrier in cooler climate zones.
Assemble the Wall
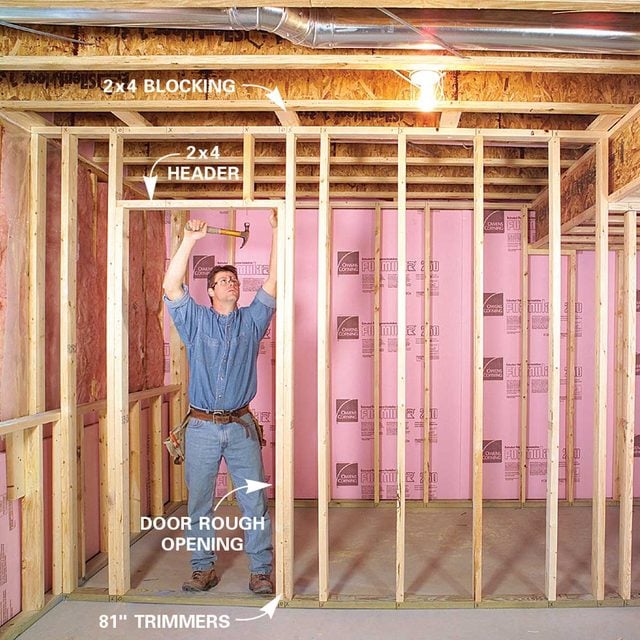
- Frame the door openings 2-1/2 inches higher and 2-1/2 inches wider than the door you’re installing.
- Note: This “rough opening” allows adequate space for the door plus its frame.
- Use a regular stud plus a “trimmer” on each side of the door.
- Pro tip: If you have low headroom, you may need to cut your doors down or special-order shorter ones. Remember to allow overhead space for the door trim. Trim that’s either missing or ripped too narrow over doors with inadequate clearance will really detract from the appearance of the room.
- Partially cut through the underside of the bottom plate at the edges of the door rough opening to make removal easier later on.
Frame Around Obstructions
Nearly every basement has something that will project past finished surfaces. That can include beams, posts, drain lines, water piping or surface mounted wires. It’s a simple matter to frame or fur out around projections and then drywall and finish them to blend in with surrounding surfaces. You’ll have to maintain access to other things like electrical junction boxes and plumbing shutoffs and clean-outs. If you need future access to anything, just frame around it and cut out the opening when you drywall.
Frame Around Valves
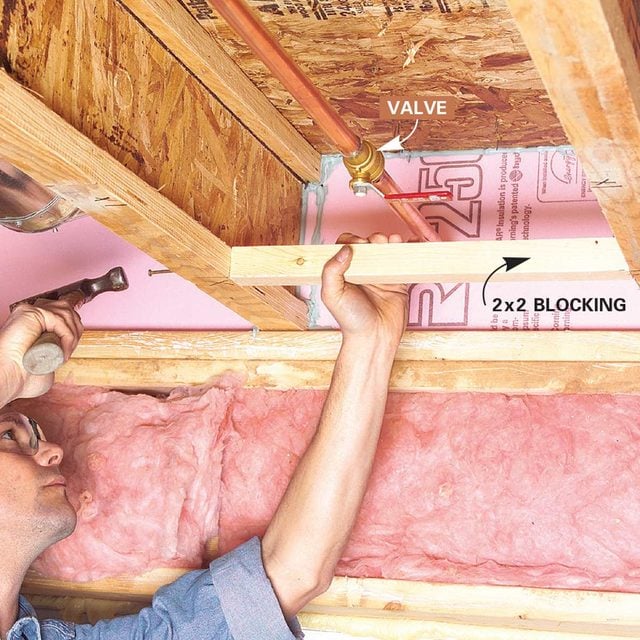
- Frame around ceiling valves with 2x2s.
- Pro tip: If you need future access to anything, just frame around it and cut out the opening when you drywall. Then, after taping and painting, screw a “return air” grate over the opening to conceal it but still have access. Return air grates are available in various sizes for about $5 at home centers. Check the sizes of available grates and frame the accesses slightly smaller.
Frame Around Plumbing Pipes
- Frame around protruding plumbing with 2x6s nailed to adjoining studs.
- Frame clean-outs for an access panel.

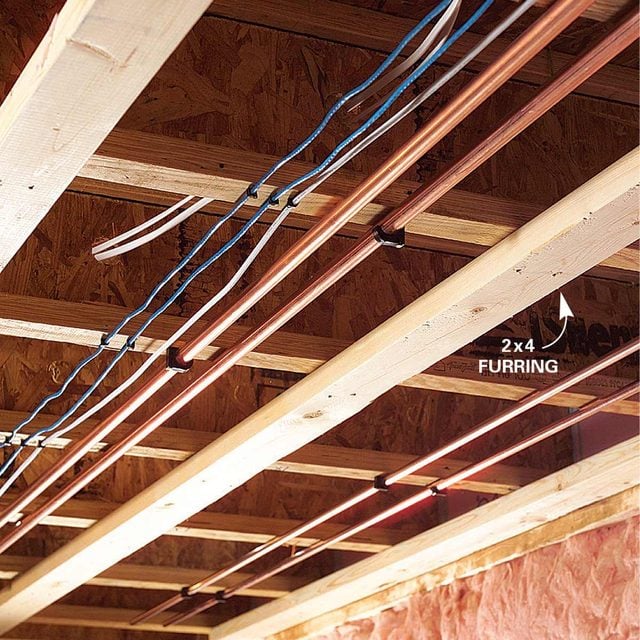
Install Furring Boards
- Use either 2x4s or 2x2s running perpendicular to the joists to add 1-1/2 inches of dead space so you can drywall over the top of everything.
- Be sure to run all the wiring and other things you might want before hanging the drywall.
- Note: Sometimes furring down part of or the entire ceiling is the best way to bury surface-mounted pipes or wires.
- Pro tip: If you have a lot of deep projections from the ceiling or you need a lot of access, consider installing a suspended ceiling rather than drywalling. The downside is that you’ll lose at least a few additional inches of ceiling height.
- Finish round steel columns by framing around them with 2x4s. You can then face the framing with drywall or decorative wood as shown in the opening photo. Get to know the cost of finishing a basement.
Check out these wall framing tips for new construction and also find out whether you can add a basement to a house.
